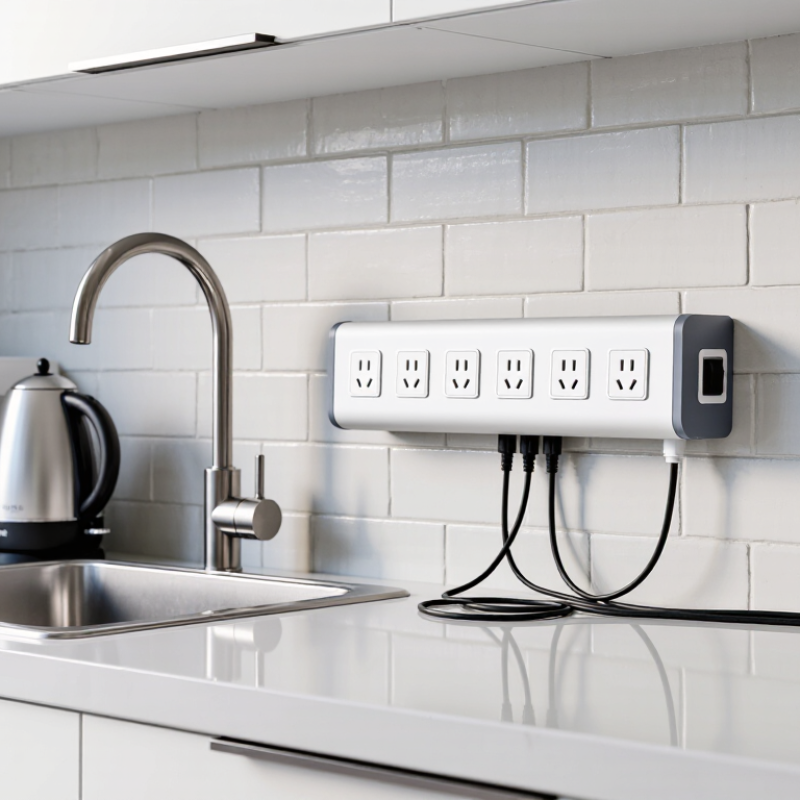
Picking out a good wall-mounted extension socket for your kitchen isn’t just about grabbing more outlets—there’s more to it. It’s about managing things like heat, moisture, how cables move around, and making sure it works well with your daily kitchen habits. A decent one should sit flush against the wall, keep cords away from the sink, and have enough space for those bulky plugs. It also needs clear info on electrical ratings, quality materials, and reliable overload protection.
Martin Cole, who’s been doing electrical installation for over 18 years, goes as far as saying, “A wall-mounted extension socket should make power access safer, not just more convenient.” And honestly, that’s pretty important, especially when you’re near kettles, microwaves, coffee makers, or other countertop gadgets. Look for features like flame-retardant housing, child-safe shutters if needed, sturdy mounting hardware, and a switch that doesn’t feel loose or flimsy. Don’t forget to double-check the length of the cable—super frustrating if it’s too short, but a mess if it’s way too long and cluttered.
Little details really matter here.
Before you buy an extension socket wall mount, take a moment to measure your available wall space and check what kind of surface you’re mounting it on—drywall, tile, or solid brick all have different fixing needs. Make sure it won’t block cabinet doors or sit right in the splash zone of the sink. Let’s be honest—sometimes it’s the little choices that make or break the kitchen’s vibe. I’ve seen nice-looking sockets mounted way too close to the sink, with cables stretched across hot surfaces—that’s not a good look or a safe idea.
Good manufacturers usually publish their load limits, test results, and installation tips. If any specs seem unclear, treat that as a warning sign. And, honestly, it’s best to have an electrician check out the wiring, grounding, and local rules before you install anything. Even if you’re careful, you might overlook something. The best wall mount extension socket isn’t just about looking good—it should be practical, secure, and fit your kitchen’s actual needs, not just impress in a photo.
Choosing a kitchen wall mount extension socket starts with identifying your real power needs. Count the appliances used at the same time, not only those stored nearby. A kettle, toaster, and blender may quickly exceed a basic socket’s safe load. Check each appliance label for wattage and calculate the combined demand. A socket with overload protection, shutters, and heat-resistant materials offers practical protection. Avoid placing it behind a sink, hob, or area exposed to steam and splashing.
Installation location also affects daily safety. Mount the socket where plugs remain visible and cables do not cross the worktop. Keep it above the splash zone, but low enough for comfortable access. A cabinet side or clear wall section may work better than the backsplash. Measure your appliance cable lengths before choosing the position. A Kitchen Extension Lead can provide extra reach, but it should never become a permanent substitute for a correctly installed outlet. A qualified electrician should verify the circuit, earthing, and local requirements.
Tips: Leave space around the socket for ventilation and cleaning. Do not overload one outlet with several high-power appliances. Inspect the casing for cracks or looseness. I once underestimated how often a socket would be used near the kettle; the position looked tidy, but the cable became awkward during busy mornings. That small mistake shows why real kitchen routines matter. Think beyond appearance. A carefully chosen location should remain convenient when hands are wet, counters are crowded, and several appliances are running.
| Kitchen Use or Appliance | Typical Power Demand | Recommended Socket Capacity | Best Installation Location | Key Safety and Planning Considerations |
|---|---|---|---|---|
| Phone, Tablet, or Small Electronics | Approximately 5–30 W per USB-powered device | One grounded socket with USB charging ports; a total rating of at least 10 A or the local equivalent | At a backsplash or wall area away from sinks and cooking splashes | Choose protected USB charging outlets and avoid placing charging cables directly over hot surfaces. |
| LED Under-Cabinet Lighting | Approximately 5–60 W, depending on strip length and driver efficiency | One standard outlet or a dedicated low-voltage lighting connection, based on the lighting system design | Inside or beneath an upper cabinet, with the power supply kept accessible | Keep the driver ventilated and protected from moisture. Do not conceal a detachable power connection where it cannot be inspected. |
| Blender or Food Processor | Approximately 300–1,200 W during operation | Grounded outlet rated for the local circuit, commonly 10–16 A depending on regional standards | On the countertop wall behind the main preparation area | Leave enough clearance for the appliance plug and keep the outlet away from the sink basin and direct water spray. |
| Toaster | Approximately 700–1,500 W | Grounded outlet connected to a suitable kitchen circuit; avoid sharing an overloaded extension lead | On the backsplash near the breakfast or preparation zone | Do not operate a high-power toaster through a low-rated adapter or a loosely connected multi-outlet strip. |
| Electric Kettle | Approximately 1,500–3,000 W | Use a properly grounded, high-current outlet on a circuit designed for the expected load | Near the water preparation area, but not immediately beside the sink | High-wattage kettles can use most of a circuit’s capacity. Check the circuit rating before using them with other heating appliances. |
| Microwave Oven | Approximately 1,000–1,800 W input power, depending on model and heating output | Prefer a dedicated grounded outlet or a circuit confirmed suitable by a qualified electrician | Behind or beside the microwave, positioned for easy access without pinching the cord | Avoid placing the outlet directly behind a built-in unit if the plug prevents the appliance from sitting flush against the wall. |
| Air Fryer or Countertop Oven | Approximately 1,200–2,200 W | Grounded outlet on a suitable kitchen circuit; avoid simultaneous use with another high-load heating appliance when capacity is limited | Behind the appliance zone, with heat and ventilation clearances maintained | Keep the socket, plug, and cable away from hot air outlets, heated surfaces, and areas where grease can accumulate. |
| Refrigerator | Approximately 100–800 W while running, with a higher short-duration starting current | Prefer a dedicated grounded outlet sized according to local electrical regulations | Behind or beside the refrigerator, accessible without removing the entire appliance if possible | Do not use a wall-mounted extension socket that can be crushed by the refrigerator or obstruct ventilation around the appliance. |
| Dishwasher | Approximately 1,200–1,800 W during heating cycles | Use a dedicated, properly protected connection or outlet installed according to local code | In the adjacent cabinet or designated service area, not directly beneath the sink unless specifically permitted and protected | Water exposure and appliance leakage protection are critical. Installation should be completed or checked by a qualified electrician. |
| Electric Cooktop or Wall Oven | Commonly 3,000–7,500 W or more, depending on size and configuration | Dedicated circuit and fixed connection or outlet selected from the appliance installation instructions | In the manufacturer-specified service zone, away from heat and moving components | Do not connect large cooking appliances to a general-purpose wall-mounted extension socket. Confirm voltage, current, cable size, and isolation requirements. |
| Sink-Adjacent Outlet | Depends on the connected appliance; often includes small appliances with loads from 5 W to 2,000 W | Use a socket with residual-current protection or ground-fault protection where required by local regulations | Maintain the locally required separation from the sink, faucet, and splash zones | Never install an outlet where water can run directly into it. Local electrical codes determine the minimum distance and protection requirements. |
| Kitchen Island or Peninsula | Varies from USB charging loads to countertop appliances of approximately 300–2,000 W | Use a fixed, grounded outlet or approved pop-up/integrated unit rated for the intended location and load | On the side panel or approved surface of the island, positioned above the finished floor as required locally | Avoid floor-level temporary extension cords. The outlet should not interfere with drawers, seating, cleaning, or cabinet hardware. |
| General Countertop Extension Socket | Should support the combined load of the appliances likely to operate at the same time | Choose a grounded unit whose voltage and current rating match the local supply; include overload and surge protection where appropriate | Mounted securely on a dry backsplash or wall surface, away from heat, steam, and splash zones | Do not exceed the socket’s total wattage rating. A wall-mounted extension socket should supplement, not replace, correctly installed fixed wiring. |
| Installation and Verification | Not applicable | Match the socket, circuit breaker, cable, plug type, and protection device to local electrical standards | Choose a location that remains visible, accessible, dry, and mechanically protected | Turn off power before any work. For new wiring, high-load appliances, wet areas, or uncertainty about code requirements, use a qualified electrician. |
A kitchen wall mount extension socket must match your electrical system, not just your countertop layout. Check the rated voltage, current, frequency, and maximum wattage before installation. A 16-amp socket at 230 volts supports about 3,680 watts theoretically, but continuous loads should remain lower. Heat needs room to escape. Never hide the socket behind an oven or refrigerator.
Socket types also matter. Choose grounded outlets for metal-bodied appliances, including kettles, microwaves, and coffee machines. Residual-current protection is important near sinks and damp work areas. IEC 60884-1 covers safety requirements for household plugs and socket outlets, while local regulations may require additional protection. The NFPA Home Structure Fires report identifies electrical distribution and lighting equipment in roughly one-fifth of reported home fires. That figure deserves attention.
Compatibility involves more than plug shape. Compare each appliance’s running wattage and starting surge, especially for motors and compressors. A mounted unit with USB ports may be convenient, but its USB output can be too weak for some devices. The IEA Electricity 2024 report expects global electricity demand to grow by about 4% annually through 2026, increasing pressure on household circuits. I have seen people count outlets instead of total load. It is an easy mistake. Leave unused capacity, keep cords away from heat, and replace any socket showing discoloration, looseness, or crackling.
Choosing a Wall Extension Socket starts with understanding your kitchen wall. A tiled backsplash needs different hardware from painted drywall or solid masonry. On tile, mark the holes along grout lines when possible. This reduces the risk of cracking the ceramic surface. Use a suitable drill bit and apply gentle pressure. For drywall, locate a stud or use rated hollow-wall anchors. A socket should not wobble after installation.
Masonry walls usually accept stronger fixing methods, such as expansion plugs and appropriate screws. Check the socket’s weight, cable direction, and clearance from sinks or heat sources. Keep the housing flat against the wall. Uneven surfaces may require spacers, but excessive spacing can stress the mounting screws. In my experience, rushed measurements cause more trouble than difficult drilling. I once ignored a slight tile slope, and the finished socket looked visibly crooked.
Tips: Test the mounting position with masking tape first. Hold the Wall Extension Socket there and check appliance reach. Leave enough room for plugs without blocking nearby switches. Use a level, even for a small socket. Follow local electrical requirements, and ask a qualified electrician to inspect connections when needed. A neat installation is not only attractive. It also supports safer daily use.
Choosing a kitchen wall mount extension socket starts with safety, not appearance. A glossy case can still hide weak contacts or poor heat control. The NFPA’s Home Fires Involving Electrical Distribution and Lighting Equipment report recorded about 26,100 home fires annually from 2015 to 2019. These incidents caused approximately 280 deaths, 1,120 injuries, and 1.1 billion dollars in property damage each year.
Look for grounded outlets, safety shutters, overload protection, and a resettable thermal cut-off. A residual-current device adds protection near sinks and wet worktops. However, it should not replace proper household wiring. IEC 60884-1 provides a useful reference for plugs and socket-outlets, while IEC 60529 helps verify the enclosure’s IP protection rating. Check whether the product has been tested for the voltage and frequency used in your region.
Material choice matters when kettles and ovens share a circuit. Flame-retardant PC or ABS housing can slow ignition, but a claimed material grade needs independent test evidence. Strong copper-alloy contacts should grip firmly without visible sparking. The cable entry also needs strain relief; a loose connection may heat quietly behind the panel. I would inspect the load rating carefully, especially for high-wattage appliances. Manufacturers sometimes print impressive numbers without explaining continuous-load limits. That gap deserves attention. The best socket is not always the newest one. It is the one with traceable test documentation, clear instructions, and protection suited to the kitchen’s real moisture and heat.
Cable length should match the actual distance from the wall socket to your worktop. Measure around cupboards, not across the cooking area. A Wall Socket Extension with 1.5 to 2 metres of cable usually offers practical reach without creating a loose loop. Extra cable can catch on a kettle or touch a hot surface. Keep the cable visible, dry, and away from sinks. I prefer a small reserve of 30 centimetres. More is not always better.
Switch design also affects daily access. A large, tactile switch is easier to operate with one hand, especially when carrying a pan. Individual switches can reduce unnecessary power use, while an illuminated switch helps confirm that power is off. NFPA analysis of 2017–2021 cooking fires recorded about 158,400 home cooking fires annually in the United States. Cooking equipment caused 470 deaths and 4,150 injuries each year. These figures support careful placement, although an extension socket cannot replace safe habits. My judgment can still slip when the counter is crowded.
Tips: Choose a socket with overload protection and a firm wall mount. Test the switch while standing at your normal preparation position. Do not hide excess cable behind appliances. Check the plug after installation. A warm plug needs attention, not guesswork.
Choosing a Wall Socket Extender for a kitchen starts with the wall, not the product photo. Check whether the existing outlet is grounded, firmly fixed, and rated for the intended load. Look for heat marks, loose screws, cracked plates, or moisture nearby. Small details matter. Add the kettle, toaster, and microwave before judging capacity. A 1,500-watt appliance can draw significant current.
Local electrical regulations may require RCD or GFCI protection near sinks and other wet areas. Required distances and mounting heights can also vary by jurisdiction. Confirm the rules with your local authority or a licensed electrician. Do not assume a replacement socket is automatically compliant. The extender must match the circuit voltage, frequency, earthing method, and enclosure requirements. Some kitchens require dedicated circuits for high-load appliances. A permit or inspection may also be necessary.
Before installation, switch off the circuit and verify that it is dead with an approved tester. Keep cables away from sinks, hot surfaces, sharp edges, and moving cabinet parts. The wall-mounted unit should use suitable anchors and remain accessible for inspection. Avoid stacking plug adapters. In practice, measurements are often misread, especially around tiled backsplashes. Recheck the outlet position before drilling. If the wiring appears old, brittle, discolored, or confusing, stop and request professional help. A neat installation is useful, but safe compliance matters more.
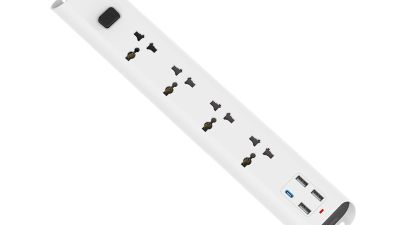
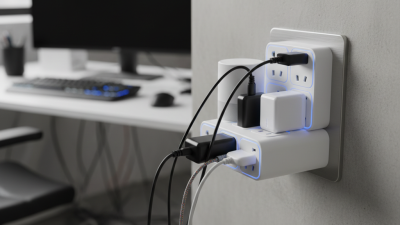
China’s 13A, 3205W surge protection extension sockets reflect growing demand for safer, higher-capacity power distribution in homes, offices, kitchens, dormitories, and travel settings. Market research on the extension socket sector highlights strong interest in compact designs, multiple charging options, improved electrical safety, and compatibility with modern connected lifestyles. A practical solution in this category combines four AC outlets with four USB charging ports, allowing users to operate appliances such as induction cookers, fans, laptops, and mobile phones from one organized power hub.
Built with imported flame-retardant materials, the HK M90-style extension socket provides reliable fire resistance and electrical insulation for everyday use. Its high-quality brass terminals support oxidation resistance, elasticity, and stable contact performance, while the master switch simplifies control over connected devices. Built-in safety shutters help reduce accidental contact with live components, and the 10/13A fuse adds another layer of protection against overload conditions.
Designed for international use, this factory-certified socket accepts plugs from various countries and complies with IEC 60884 requirements. Its compact, multifunctional structure makes it suitable for residential and commercial environments where space, convenience, and dependable power access are important.
Count appliances running together, not appliances stored nearby. Add their wattage from the labels. A kettle, toaster, and blender may overload one outlet.
Choose a clear wall or cabinet side above the splash zone. Keep plugs visible and cables away from sinks, hot surfaces, and sharp edges.
No. Steam, splashing, and heat can damage the casing and contacts. Choose a dry, reachable location instead.
Look for grounding, safety shutters, overload protection, and heat protection. A residual-current device may add protection near wet areas.
Flame-retardant materials can slow ignition. Firm copper-alloy contacts and strong cable strain relief also matter. Do not trust impressive ratings without test evidence.
Inspect for cracks, loose screws, discoloration, heat marks, and moisture. Confirm the circuit voltage, frequency, grounding, and load rating.
It can provide temporary reach, but it should not replace a correctly installed outlet. Avoid cables crossing crowded worktops or touching hot surfaces.
Yes. Rules may cover wet-area protection, mounting height, circuit capacity, and inspection. A qualified electrician should confirm the requirements before drilling.
Switch off the circuit and verify it is dead with an approved tester. Use suitable anchors. Recheck measurements around tiles. Measure twice.
A tidy position may become awkward beside a frequently used kettle. Consider wet hands, crowded counters, cleaning space, and several appliances running. Appearance is not enough.
Choosing the right kitchen extension socket wall mount starts with understanding your kitchen’s power needs and identifying the most convenient installation location. Consider how many appliances will be used, their total wattage, and whether the socket offers suitable outlet types for your equipment. Check the voltage, current rating, plug compatibility, and cable length to ensure reliable performance without overloading the circuit. The wall surface also matters, so select a mounting method that provides stable support and allows easy access to switches and sockets.
Safety should be a priority when comparing options. Look for durable, heat-resistant materials, protective shutters or covers, overload protection, and suitable moisture resistance for the kitchen environment. A clear switch design can make everyday use more convenient, while a well-positioned cable helps reduce clutter and tripping hazards. Before installation, confirm the mounting space, required tools, wiring conditions, and any local electrical regulations. When uncertain, consult a qualified electrician to ensure the kitchen extension socket wall mount is installed safely and correctly.